Friday, March 15, 2013

Chocolate Crinkles


My husband is a smart guy, and I'm a lucky lady to have him! Two weeks ago he was traveling on business (boo) in Fort Wayne, Indiana (where? exactly.) But, like I said, he is a smart guy and when he's traveling he likes to make it up to me by bringing me my favorite treat, chocolate truffles. And lucky for me there's a chocolate shop in Fort Wayne that is now my favorite! How good are they? Let's just say that Donald Trump keeps these little tasties on hand at all times and gives them as gifts and thank yous. So, if they're good enough for the Donald then they're good enough for me! And then some, I devoured the box in two days...2! That wasn't so smart because now they've been haunting me, I can't get them out of my mind. And since I don't have these delicious truffles to turn to in my time of need I'm going to have to take some measures to fix this serious chocolate craving I'M. HAVING. RIGHT. NOW!!! This is where chocolate crinkles come in, thankfully:) sigh


ok, let's get started. As for most baking, the eggs need to be at room temp, especially because this recipe uses melted chocolate. I wouldn't want the cold eggs combining with the warm chocolate and creating unsweetened chocolate lumps- not good. Here's a trick if you're like me and you bake on a whim- fill a bowl with hot tap water, drop - gently - the cold eggs into the water and let sit while you work on melting the chocolate and gathering the other ingredients. Works like a charm every time!


I prefer to melt chocolate in the microwave. Roughly chop unsweetened chocolate and place in a glass measuring cup.


Microwave on high, stirring every 30 seconds until the chocolate is smooth. This took a total cooking time of 1:30.


On to the mixing, in a large bowl combine eggs, sugar, baking powder, oil, vanilla and mix well.


Add in melted chocolate, mix well.


Add flour and mix til well combined. Scrape the sides of the bowl if needed.


Cover and refrigerate for 1-2 hours, or up to the night before baking.


When you're ready to bake, preheat the oven to 375 degrees. Pour some powdered sugar into a small bowl. Scoop about a tablespoon of dough and roll between your hands til you have a ball - about 1" across is the goal. Place into powdered sugar.


Roll in powdered sugar until completely coated and ...


..place on a cookie sheet about 1" apart. Continue til full and bake for 8-10 minutes.


Aren't these scrumptious looking?! They are like the perfect little brownie bite, crispy on the outside, chewy on the inside and the powdered sugar puts it over the top, yum! I got about 50 cookies out of this batch, they may last more than 2 days, mmmmm, maybe not:-)

On a side note, I was telling my husband how AMAZING those chocolates were and to my surprise he shipped me another BIGGER box, wow, true love<3

Chocolate Crinkles
from Better Homes and Gardens Cook Book

3 eggs, room temp
4 oz unsweetened chocolate, melted
1 1/2 c sugar
2 t baking powder
1/2 canola oil
2 t vanilla
2 c ap flour
1 c powdered sugar

In a large mixing bowl combine eggs, sugar, baking powder, oil and vanilla. Mix well, scraping sides of bowl as needed. Add in chocolate, mix well, scraping sides of bowl as needed. Add in flour and combine well, scraping sides of bowl as needed. Cover and chill for 1-2 hours. When ready to bake preheat oven to 375 degrees. Scoop about 1 tablespoon of cookie dough, roll between hands to shape ball and roll in powdered sugar to coat fully. Place on a cookie sheet about 1 inch apart. Bake for 8-10 minutes. Let set for a few minutes after removing from oven, then cool completely on a wire rack. Enjoy:)

Sunday, February 24, 2013

Cheesecake


I remember the first time I had cheesecake, I was about 10 years old at a church potluck. My best friend's mom brought a cherry cheesecake and I thought I had died and gone to heaven! And that is quite fitting because today my friend, Annie, is making cheesecake with me. She is 10 years old, loves to dance and loves One Direction. I'm not quite sure who they are, but I have a feeling I'm the only one! I'm super excited to have a girl in the kitchen with me today, let's get cooking:)

Beginning with the graham cracker crust, place crackers, sugar and butter in a food processor and pulse until fully combined. Pour it into a spring form pan, pat down with a drinking glass and bake for 10 min. I would give you pictures of this, but Annie & I were having so much fun that we forgot to take them!


Ok, moving on to the filling (and the pictures!), place cream cheese in a large mixing bowl. Make sure it's at room temperature or your cheesecake will be lumpy- not good! Give it a mix to break it up.


Next add in the vanilla and sugar and mix well, making sure to scrape down the sides of the bowl. Isn't it already looking delicious?!


Finally, add in your room temperature eggs 1 at a time, scrape down the sides of the bowl and give it one last mix. Definitely nice having extra hands in the kitchen, thank you Annie!!!


While the crust is hot, pour the cheesecake mixture into the crust and give it a little shake to even out the filling. Reduce the oven temp and place the pan back in the oven and bake for about 45 minutes. Start checking after 35 minutes so that it doesn't over bake.


You'll know when the cheesecake is done when the center 2-3 inches jiggles a little when you tap the pan. At this point turn your oven off and crack the door a few inches, let sit for about an hour. When the cheesecake is at room temperature move it into the fridge to fully chill.


While the cheesecake is chilling make the topping. In a small mixing bowl combine sour cream, sugar, vanilla and salt.


Mix until sugar is fully dissolved.


To unmold the cheesecake, gently unlatch the hinge on the spring form pan and wiggle til the cake is free from the sides of the mold. Run a long knife all the way under to loosen the crust from the bottom of the pan and place on a serving plate.


Pour the sour cream topping on top of the cheesecake and spread evenly.


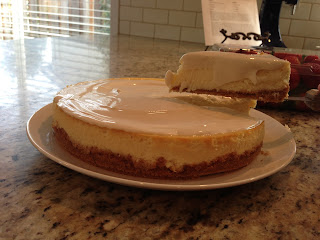
Annie- that looks great! Thanks for all your help today, I had so much fun:)


Cheesecake

Crust:
1 pkg graham crackers
6 T melted butter
¼ c sugar

In oven place rack on middle shelf, second rack on bottom. Preheat oven to 350 degrees. Pulse ingredients in food processor till desired consistency and combined (I like mine super fine). If you don’t have a food processor then place crackers on a Ziploc bag and crush with a rolling pin. Place crushed crackers in a med bowl along with remaining ingredients, combine well. Place in a 9” spring form pan and pat down with a drinking glass. Place spring form pan on a cookie sheet and bake for about 10 min, or till lightly brown. While the crust is baking prepare the cheesecake filling.

Filling:
1 ½ lb cream cheese (3 pkgs)
1 c sugar
1 t vanilla
3 eggs 

Topping:
1 c sour cream
¼ c sugar
1 T vanilla
1/8 t salt

Bring cream cheese and eggs to room temp (I leave mine out over night and bake in the morning, if you’re baking in the afternoon then pull out that morning). Place cream cheese in mixing bowl and beat on med speed for 30 seconds. Gradually add in sugar and vanilla till well combined. Scrape down the sides of the bowl. Add the eggs in one at a time, mixing thoroughly after each egg. Scrape down the sides of the bowl, and mix briefly making sure to mix thoroughly.

When crust is done remove it from the oven and turn the oven down to 300 degrees. Place a pan of hot water on the bottom rack. While the crust is still hot pour in the cheesecake filling and bake at 300 degrees for about 45 min, start checking after 40 min. The cheesecake is done when the middle 2-3 inches is still slightly jiggly when the pan is tapped. Turn oven off, leave the cheesecake in the oven with the door cracked for 1 hour. Remove the cheesecake from the oven and let chill completely in the fridge. When cheesecake is cooled mix the sour cream, sugar, vanilla and salt till completely combined and spread over the top of the cheesecake. Cover and chill. About 1 hour before serving pull the cheesecake out of the fridge to remove the chill. Enjoy!

Thursday, February 21, 2013

Butternut Coconut Kale Soup


This soup is a new recipe for me. I love that it has that comfort food feel on these cold winter days, but it's super healthy, too. The butternut squash is a little sweet, coconut milk makes it really creamy and the kale gives a nice added texture, not to mention that it's super nutritious! I hope you like it:)


I've peeled and chopped up a medium butternut squash.


Add the squash into a crock pot along with onion, garlic, water and seasonings. Set to high and cook for 3 hours.


At this point, using a hand blender, puree the veggies til smooth.


Add a handful of kale (make sure you remove the thick stems) and cook on low for another hour.


Once the kale has cooked down add coconut milk and stir until it's combined well. Coconut milk will loose flavor the longer it cooks, since it doesn't need cooking I'm adding it at the end so I get the full yummy coconutty flavor that I love:) At this point it's done, just give it a little taste for seasoning (mine just needed some salt) and enjoy!

Butternut Coconut Kale Soup

1 onion, chopped
2 cloves garlic, minced
1 medium butternut squash, peeled, seeded & chopped
1 c water
1 T basil
salt & pepper
handful kale, rinsed, chopped & stems removed
1 can coconut milk

Place onion, garlic, squash, water, basil, salt & pepper in crock pot. Set to high and cook for 3 hours. Using a hand blender, puree cooked veggies until smooth. Add in kale, cook on low 1 more hour. Once the kale is cooked down add in coconut milk and stir til combined. Taste for seasoning and enjoy.

*If you want to omit the kale just add coconut milk after you blend the veggies, it's ready to serve at this point.

Tuesday, February 19, 2013

Aunt Lovilla's Salsa


May I begin by saying that this salsa rocks? Well, I just did so there:) Seriously though, if you're going to take the time to make fresh salsa, then this is the salsa you want.  Just after I had my first son my husbands aunt Lovilla came for a visit.  She made this amazing salsa and my husband asked if I would get the recipe so that I could make it for him. Being the dutiful wife that I am (hey now, I herd that snicker!) I obliged. Little did I know that it would soon become a favorite not just of my family's, but friends, too. Yes, I have been scolded more than once for not bringing it to a potluck, or preparing it for guests. Please learn from my mistakes, bring it to all your functions and enjoy the praises that abound for your diligence:)


Begin by finely chopping the jalepenos and garlic cloves. First remove the stems and seeds from the jalepenos, and the paper from the garlic cloves.


With a food processor or blender on, drop the jalepenos and garlic cloves into the machine. You can see in the bowl I've already dropped the garlic in here.


Scrape down the sides of the work bowl and add in tomatoes and seasonings, puree.


Place that into a medium size bowl.


Back in the work bowl of your food processor or blender add in the remaining tomatoes along with the tomatillos and cilantro. Pulse until chopped but still chunky.


Pour that on top of your puree.


Last into the bowl go the sliced green onions.  Stir to combine and chill for at least 1 hour before serving. Serve with your favorite tortilla chips and enjoy!


Aunt Lovilla's Salsa:

2 cloves garlic
3-6 jalapeƱo’s (I use 3)
1 ½ t salt
1 t ground oregano -or- 1 ½ t crushed oregano
½ lb fresh tomatillos (about 3-4 medium sized)
¾ bunch cilantro, chopped
1-28 oz can diced tomatoes, divided
1 bunch green onions, sliced thin

With a food processor or blender on, drop the jalepenos and garlic cloves into the machine. Place 1 c tomatoes, oregano and salt in food processor or blender and puree. Place that in a medium sized bowl. Place remaining tomatoes along with tomatillos and cilantro in processor/blender. Pulse til chunky and add that to the bowl. Add thinly sliced onions to bowl and mix to combine. Cover and refrigerate for at least 1 hour, over night is better. Enjoy!

Thursday, January 24, 2013

Chimichurri Sauce


As the new year has rolled in so have the new years resolutions.  In general in our home we are trying to get back on track with eating healthy, exercise and the like.  So I am cooking all paleo dinners for the month of January to get us started of right.  This is my husbands preferred way of eating and since he has been mostly paleo for the last 3 years I have seen him feeling healthier, have more energy and of course his clothes are fitting very nicely:)  So while I was resistant in the beginning I am now more on board with the whole idea.

If you don't know what paleo eating is, it is simply cutting out grains and sugars in your food.  This eliminates almost all processed food (which I love) (eliminating it that is!), sweet treats, baked goods (boo) and high starch veggies and fruits like potatoes (also boo!).  What's left? Well, mostly proteins, including nuts, meat, poultry and fish; vegetables (lots and lots of vegetables) and most fruits.  Some people continue to eat dairy, others eliminate it, but we do include dairy in our diet.

How does this all relate to chimichurri sauce?  I thought you'd never ask:)  I am not a huge meat fan.  And since I have taken away all the yummy, starchy sides that I adore, I needed to find a way to enjoy my healthy eating experience.  I have found that any way I can season or sauce up my protein is very beneficial in my eating enjoyment!  I do love food, remember? So what's to love if you don't enjoy what you're eating.

Chimichurri sauce reminds me of a mexican pesto.  It's got a beautiful bright green color and lots of spice and flavor from jalepenos, cilantro and lime juice.  It's perfect to brighten up grilled chicken or steak and light enough for fish, too.  The added bonus- it's super easy to make!  Here's how I make mine...


Begin with a jalepeno or 2 with seeds and ribs removed.


While the food processor is on drop them into the bowl and chop fine.   Scrape the sides of the bowl down.


Add cilantro, parsley, lime juice, oregano, salt and pepper to the bowl.


Pulse til finely chopped and combined.


Stream in the olive oil until it's the consistency you desire. This is not as thick as pesto because it doesn't have pine nuts or cheese.


Feast with your eyes first!  Enjoy.

Chimichurri Sauce

1 c cilantro
1/2 c flat leaf parsley
1-2 jalepenos
1 t crushed oregano
juice of 1 lime
salt and pepper to taste
olive oil

With the food processor or blender on, drop in the seeded jalepenos to chop fine.  Place cilantro, parsley, oregano, salt, pepper and lime juice in the bowl.  Pulse to chop fine.  Stream in olive oil to desired consistency. Taste to adjust seasoning.  Top over meat, chicken or fish.


Monday, January 21, 2013

The Best Chocolate Chip Cookie


I have to admit that I am a cookie lover.  In fact, I have not ever met a cookie that I didn't like.  I'm not picky when it comes to my cookies, I like store bought and homemade.  I like healthy breakfast cookies and rich, decadent cookies.  I like both soft and chewy and  crispy, crunchy. But nothing beats a classic chocolate chip cookie, and this is my favorite recipe.  It's soft, chewy and has just the right buttery, chocolatey goodness that you want in a classic:)


Begin by creaming your melted butter and sugars.


Add in the vanilla and milk.  Make sure to stop the mixer and scrape the bowl before you continue to the next step.


Add in the combined dry ingredients, mix til just combined being careful not to over mix


Lastly add in the chocolate chips.


This recipe chills before you bake the cookies, so its perfect to make the dough the day before you bake them.  Cover and refrigerate for a couple hours, up to over night. When ready to bake- preheat oven and scoop spoonfuls of dough onto a baking sheet.  Bake for 9-11 minutes.  Let set for a couple minutes on the cookie sheet, then remove to a wire rack to cool completely.

It's tough to resist eating these while they're fresh out of the oven, but if you can't eat them all freeze the leftovers...they're ridiculously good right out of the freezer too;)  Hope you enjoy!

Chewy Chocolate Chip Cookies
adapted from Alton Brown

2 sticks salted butter, melted
1/4 c sugar
1 1/4 c brown sugar
1 egg
1 egg yolk
2 T milk
1 1/2 t vanilla
2 1/4 c ap flour
1 t baking soda
1 t kosher salt
2 c chocolate chips

Melt butter in microwave.  Measure both sugars into a large mixing bowl, add melted butter and cream together.  Add in eggs, milk and vanilla and mix well.  Add in combined dry ingredients and mix just til combined.  Mix in chocolate chips.  Cover and chill for at least 2 hours, up to overnight.

When ready to bake, preheat your oven to 375F.  Spoon about 2 T dough onto a baking sheet and bake for 9-11 minutes.  I like to bake mine a little under and let them sit on the cookie sheet for a couple minutes, once set move to a wire rack to cool completely.

*this dough freezes well.  I like to freeze it in single cookie portions.  When ready to bake- preheat oven to 325F and bake for 16-18 min.  Remove immediately to a wire rack to cool.