Friday, July 24, 2015

Lemon Waffles with Blueberry Syrup, Dairy Free


Our weather has been so fantastic this summer...and I don't say that lightly- where I live summer doesn't really begin until 4th of July. But not this year, beginning early in the spring we've had beautiful sunshine and warm- no- hot weather. I LOVE IT!

Along with great weather, all the local produce has ripened early, which brings me to one of my favorite things in summer. Picking fruit for, well, of course eating...but also to make jam for the year and to freeze to use in recipes like I've made today.

This dish is a go to for a slow Saturday morning around our house, only this time I added a twist. Lemon waffles smell so fragrant when cooking in the waffle iron, the perfect compliment to homemade blueberry syrup. Treat yourself this Saturday!

Lemon Waffles

1 3/4 c ap flour
zest of 1 lemon
1 T baking powder
1 T sugar
1/2 tsp salt
1 1/2 c hemp milk (does not alter texture of finished product like some other milk subs)
1/2 c vegetable oil
3 eggs
juice of 1/2 lemon

In a large mixing bowl combine the flour, lemon zest, baking powder, sugar & salt, set aside.

In a large measuring cup (4 cup) add lemon juice, then milk to make 1 1/2 cups. Add to that oil & eggs and mix well making sure the eggs are fully incorporated.

Add wet ingredients to dry and stir with a fork just until moist, let lumps remain or the waffle will be tough.

Pour batter into heated waffle iron and cook until golden and crisp.

Blueberry Syrup

3 cups fresh or frozen blueberries
1/2 c sugar (less if they're super sweet)
splash of water
2 T corn starch
juice of 1/2 lemon

Place the blueberries, sugar and water into a medium sauce pan. Turn on high heat and cover to bring to a rapid boil, stirring occasionally. Once the blueberries are boiling and bursting turn the heat down to low.

In a small dish, combine the lemon juice and corn starch, add a little water if it's too thick. Stir until no lumps remain.

While stirring the blueberries continuously, pour in the lemon/corn starch mixture. The blueberry syrup will thicken immediately. Continue stirring until the corn starch is worked all the way through and the syrup has no lumps. Remove syrup from heat. Smother waffles & sing the song "Waffles waffles waffles...waffles waffles waffles..."

Tuesday, July 21, 2015

Grilled Corn Salad


We've settled into the summer routine. You know how it goes, sleeping in late, coffee for mom on the back patio and cheerios for the kids around 10. Then we have all the usual summertime activities to choose from- go swimming, pick berries, ride bikes around the neighborhood, go to the library. Our newest activity is to find a fun new location and film time-lapse videos. What fills your summer days?

Yesterday I took my youngest to over-night camp...the first time for him...sigh:( The house is quiet without him around. I imagine he's having a great time, meeting new friends, staying up way too late & giggling til his tummy hurts. I can't wait to hear all the stories when he gets home.

And other than swimming and exploring there is the eating. Isn't summer just the best for eating? Sweet corn on the cob, juicy peaches, tart lemon-aide. It's all so good. This is my new favorite summer salad. Sweet fresh corn, spicy chili & lime juice bring it all together. With a light dressing it allows these bright summer flavors to shine. I hope you like it too!

Grilled Corn Salad

3 ears corn on cob
1 head of romaine lettuce
1 bunch cilantro
1 avocado
1/4 c roasted red peppers (from a jar is fine)
2 limes
2 Tbsp olive oil
1/2 tsp smoked paprika
1/2 tsp chili powder
1/2 tsp kosher salt
2 boneless, skinless chicken breasts


Beginning with the corn, shuck & rinse then grill on med-high to high heat on all sides till slightly charred, about 10 minutes total time. Remove to a plate until cool enough to handle. Season chicken with salt, pepper, chili powder and red pepper. Grill 3-4 minutes on each side, until cooked all the way through. Remove to a plate and cover with foil for 5-10 minutes.

Chop the lettuce, cilantro, avocado & red peppers into a large bowl. Zest the limes into the salad. Then, using a disposable solo cup upside down, score an x into the bottom. Set in the salad bowl x up. Place one end of the corn onto the x (this will hold it in place while you cut), hold the other end upright and slice corn off into the bowl.

With all salad ingredients in bowl, sprinkle seasonings evenly over top. Juice the 2 limes into the salad & drizzle olive oil on top. Toss to coat evenly, mixing ingredients together. Chop chicken and toss in salad. Serve with tortilla chips on the side.

Friday, May 29, 2015

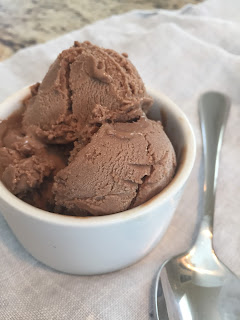
Chocolate Ice Cream...Oh Yeah, it's Dairy Free!


Hello my foodie friends- it's been a long time! February 2014 (2014!!) is the last time I sat down to share with you. Life has been busy, and so, My Second Love has proven to be exactly that...second.

What have I been doing all this time?

A lot! Let me share with you. In my food world I'm still hanging in as dairy free, although I do splurge on (rare) occasion. Sometimes emotion or circumstance overrides good sense, you know? I've found that if I don't let this happen often I can endure the occasional slip up...or sometimes intentional act, depending on the situation.

The boys are growing and their life is getting busier. My oldest is finishing 7th grade, he went out for track this year, continues to be very involved in band and jazz band playing the trumpet, serving in church and attending youth group during the week. He kind of thrives in the business of life, he also has the energy to keep up at that busy pace. My youngest is finishing 4th grade, participated in school choir and continues to play guitar. It was during his first guitar recital last fall when he discovered that he loves to be in front of an audience to entertain! He's very creative and puts a lot of thought into everything he does...he surprises and amazes me daily.

The biggest change in my life has been in the bible study that I do...and the main reason for the crickets here in the blog. Not long, maybe a few weeks, after my last post I was invited to be the administrator of the bible study that I attend. I will do a plug here, because I do think this is a wonderful ministry that teaches the bible in a way that is transformative. It's called Bible Study Fellowship (click to go to the web page). I have participated in the study for about 6 ('ish) years and served (volunteered) as a group leader for 3 of those years. I have been a follower of Jesus most of my life, but it wasn't until doing this study that I really began to understand my faith, the bible, how Jesus' sacrifice completely fulfilled the old testament law, prophecy and also saves eternally those who believe in Him. When you have that truth in your life, it is transforming. And so, because of these reasons and with a prayerful and humble heart I did accept the position and the (exciting) whirlwind began. It has been a huge blessing in my life, I realize this is a food post, so I won't use up your time with all the ways. But in addition to the huge blessing, it does indeed fill up my days, hours and minutes. [oh also, BSF is free and has over 1100 classes worldwide for men, women and children...go find a class and sign up!]

With that, cooking has become necessary, but not primary. Most of the time I cook now I'll make meals to last 2 days so that my time is freed up to be with my family and investing in my new administrative duties. The food I'm making are tried and true recipes that don't require a lot of thinking and planning. As of right now we are on a summer break from BSF, life is slowing down, time is freeing up and creative juices are beginning to flow. I love the creative process.

Time For The Food

So let me share with you a recipe for homemade chocolate ice cream that I put together a few days ago. I got an ice cream maker last summer, but didn't have much time to experiment with it, so I've been excited to get it out and try something new! I've found when making DF ice cream is that without the fat content of whole milk or heavy cream it seems a bit icier than what a traditional ice cream is. To get around this I used some coconut milk. It has great consistency, but also has a strong coconut flavor. There are a couple of ways to resolve this issue. One option is to bring the coconut milk to a boil and cook for a few minutes, then return it to room temp before proceeding with the recipe. Another option is to use partial coconut milk and another dairy free milk to make up the full amount of milk. That's what I did, it still has a little undertone of coconut, but it's very mild and paired with chocolate is delicious. I also chose to use a custard style recipe (with eggs) to give my ice cream a rich flavor. I think this one is a hit! If you decide to make it, let me know in the comments below how yours turned out, if you changed the recipe or anything other thoughts you have. 


DF Chocolate Ice Cream

Ingredients

2 1/2 c cashew milk
1 c coconut milk (from a can, not light)
1 1/2 t vanilla extract
pinch salt
2/3 c sugar, divided
5 egg yolks
3/4 c DF chocolate chips

In a medium sauce pan combine both milks, 1/3 c sugar and salt over med low heat, bring just to a boil. In a separate bowl combine the other 1/3 cup sugar and the egg yolks, mix with a hand mixer until it's light and fluffy and the eggs have turned a pale yellow. Place the chocolate in the bowl that you'll chill the mixture in, set aside. 

Once the milk has just come to a boil temper the eggs. [While whisking the eggs, slowly pour the milk -1/2 cup at a time- into the eggs until you have about half of the milk added in. Then pour all of the egg/milk mixture back into the sauce pan.] Cook over low heat while stirring constantly for a few minutes. Do not boil. What you're looking for is the mixture to slightly thicken so that it covers the back of your spoon.

Pour the mixture through a fine mesh sieve into the chocolate chips. Whisk until all the chocolate is melted and combined into the warm cream. Cover and refrigerate over night. Don't forget to also freeze the bowl of your ice cream maker.

When everything is thoroughly chilled, turn on the ice cream maker and pour in the mix. Mine ran for 15-20 minutes until it was ready to move to a storage bowl and then frozen a couple hours before it was an ice cream consistency.

Ice cream...just so good!