Monday, November 12, 2012

Penne Pasta with Pesto


I love a good pesto!  Of course if you want good pesto you'll need to make it yourself.  No good pesto, from my experience, has ever come from a jar.  And not to mention the price!  yikes.  Most of the ingredients you have already in your pantry.  The one wild card just might be the basil.  You can readily get fresh basil at any store, that's not the problem.  But the basil itself bruises and turns black very quickly.  Even if you make it the same day you buy it, the pesto itself goes downhill pretty fast once you start chopping it up.  So instead of basil I like using fresh spinach.  It's cheap, pre-washed and prepped for ease and won't turn brown before you make pesto or while making it:)


Start with a good hunk of parmesan cheese, don't buy pre-grated if you don't have to.

Cut it into big chunks and...


then throw in it the food processor for a minute or 2, til it looks like this.  Set to the side in a bowl.


Gather ingredients: spinach, cheese, pine nuts, garlic, olive oil, salt and pepper


With the food processor on drop in 2 whole garlic cloves to chop fine.


Next add in spinach...


pine nuts...


cheese...


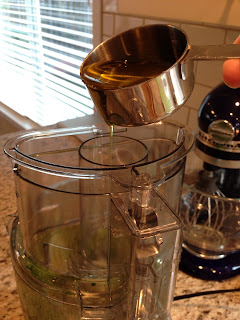
after all that is combined drizzle in the olive oil until it's emulsified.


Give it a taste and add salt, pepper to your liking.  I usually need to add a bit more spinach or cheese to balance things out.  You'll know when you taste it.


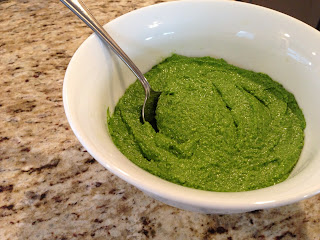
Place in fridge til ready to use...look at that beautiful green color, love it!

My husband likes his pesto tossed with penne pasta (I have rice pasta here for a gluten free meal), some peppers, sun dried tomatoes and chicken.


While you're prepping veggies and chicken put a large pot of water to boil and cook pasta according to package directions.  Warm a skillet over med-high heat.  Toss peppers in olive oil for a couple minutes.  Remove to a dish.


Add in chicken to cook through


Toss back in the peppers along with sun-dried tomatoes, stir and turn off heat.


Before you drain your pasta always reserve a cup of cooking water, this will help bring the dish together in the end.


Drain pasta and place back in pot.  Add in a couple dollops of pesto and stir to combine.  This will be pretty thick so add in some of the starch water, not all, just enough to make your pasta creamy.


Stir in the chicken and veggies, place in a serving dish and enjoy:)

Penne Pasta with Pesto

For Pesto:

2 cloves garlic
3 big handfuls of spinach
1/3 c pine nuts
1/2 c parmesan cheese
1/4 c olive oil
salt and pepper


With the food processor on drop in 2 whole garlic cloves. Next add in spinach, pine nuts, cheese one at a time, combining after each addition.  After all that is combined drizzle in the olive oil until it's emulsified.  Give it a taste and add salt, pepper to your liking.

For pasta dish:

Penne pasta
1/2 yellow pepper, chopped
1/2 orange pepper, chopped
1/4 c sun-dried tomatoes, soaked in hot water
boneless, skinless chicken breast, cut to bite size pieces.

Cook pasta according to package instructions.  Reserve 1 c of cooking water before draining.

While pasta is cooking, in a large skillet over medium high heat toss peppers in olive oil for a couple minutes.  Remove to a dish.  Add in chicken to cook through, toss back in the peppers along with sun-dried tomatoes, stir and turn off heat.

Add pesto to hot pasta and stir adding reserved water if needed.  Stir in chicken and veggies, enjoy:)

Sunday, November 11, 2012

Thumbprint Cookies


A cherished memory of mine from childhood was when my mom would make a variety of cookies and treats for our friends and family around the holidays.  It was not like family baking time or anything like that.  But, being a quiet, observant child, I would watch her make a grocery list, gather the ingredients and dig out all the necessities that weren't needed the rest of the year.  There were different chocolates and nuts, candy making molds, baking dishes and of course the beautiful holiday tins that she would package the handmade gifts in.  I could help -or not- it wasn't about her giving me a baking lesson as much as it was about her remembering the loved ones in her life and being thankful for them.  I suppose it was more a life lesson instead:)

One of my very favorite things she would make were thumbprint cookies.  If I was lucky I would catch her while she rolled the little balls of dough because then I could help make the thumbprints in each one.  These jam filled shortbread cookies are so simple, they really make the perfect homemade treat for a neighbor or guest.


I begin by beating butter and powdered sugar in a mixing bowl.


Scrape the sides down and add in the vanilla.


Finally, with the mixer on low add in the salt and flour, scraping the sides of the bowl as needed.


If your butter is too soft when you begin you might want to chill the dough for 15 minutes- just so they roll easier.  Mine is just right.  Roll about a tablespoon, or a little less, into a ball and place on a lined cookie sheet.


With the back of a teaspoon, or your thumb, press down in the middle to create a cup.  Not too far down though or the cookies will not hold the jam.


Place some of your favorite jam in each little cup.  I have raspberry today, mmm!


Bake just until the bottoms start to turn golden brown and the top is set, 15-20 minutes.


When you take them out of the oven immediately place them onto a cool flat surface to cool completely.


Once cooled dust with more sifted powdered sugar.  The boys love watching me do this part, they triy to catch the little bits of falling powdered sugar:)


Thank you, mom, for teaching me many valuable lessons in life, even if you didn't know you were doing it!  Those are the best kind:)

Thumbprint Cookies
1 c butter, room temp
1/2 c powdered sugar
2 t vanilla
2 c ap flour
1/4 t salt
your favorite jam for filling
extra powdered sugar for dusting

Preheat oven to 325F.  In a large mixing bowl beat butter and powdered sugar.  Scrape down sides and add vanilla, mix to combine.  With mixer on low add in salt and flour- 1/2 cup at a time til thoroughly mixed.

Roll dough into 1" size balls and place on a lined cookie sheet.  Using a teaspoon or your thumb press down to create cups in each ball.  Place about 1/2 t jam in each cup.  Bake for 15-20 minutes, til bottom is lightly browned and tops are set.  Immediately place on a cool flat surface to cool.

When completely cooled dust with powdered sugar and enjoy!

Tuesday, November 6, 2012

Stove Top Mac & Cheese


Stove top mac & cheese...what can I say?  It was the first thing I learned how to cook as a kid.  It's inexpensive, therefore always an option.  Needless to say, I grew up eating it and to this day, with a diet coke, it's still one of my all time favorite meals.  It instantly brings me back to the living room in my home growing up, with my sister and a video recording of the daily soaps.  Ahhh, that was the life!  But I digress...

If you got here via Facebook, then you may remember a couple years ago when I was on the search for the perfect (creamy, cheesy, yummy) home made version.  I mean how hard can it be to boil some noodles and add cheese, right? Well, it is.  I must have tried dozens of combinations of cheese, using a rue for the sauce and on and on.  Well, I finally figured it out...YES!  Even better- this recipe can easily be gluten free, I know there are many of you out there!  Wheat free or not you won't be disappointed, I hope you like it:)


Begin with pasta of your choice in a medium sauce pan.  I'm using brown rice macaroni, but I've made it with traditional macaroni as well and it's just a good.


Add cold milk and salt, place pot over medium heat.


Cook this for several minutes, til pasta is tender.  Keep close by, as the noodles cook the milk will be absorbed and thicken.  You'll want to stir the pasta a few times during cooking so that they all get cooked, especially as the milk goes down.


Once the noodles are the softness that you like add cheese.  I have some cream cheese and cheddar.


Start with the cream cheese and stir to soften.


Add in cheddar 1/2 c at a time, stirring while it melts.


Once all cheese is added let it cook for just a minute more to combine all flavors, then give it a little taste to see if it needs more salt or other seasonings (red pepper for a kick, or dry mustard for depth).  I like mine pure and cheesy, yum!

Even better is that this makes enough for 2-3 servings which means my lunch is made for tomorrow, too!

Stove Top Mac & Cheese

2 c pasta
2 1/2 c milk
1 t salt
1 c cheddar, shredded
2 oz cream cheese

In a medium sauce pan combine pasta, milk and salt.  Cook over medium heat til the pasta is tender, stirring occasionally.  Stir in cream cheese til soft.  Add in cheddar 1/2 c at a time stirring to incorporate.  Taste for seasoning and enjoy!

Sunday, November 4, 2012

Stuffed Bell Peppers


When I think of stuffed bell peppers, acorn squash or other similar casseroles I think of weekends and potlucks.  But not so with my version of stuffed bell peppers.  This hearty comfort dish is quick enough for mid-week and hits the spot on a windy, rainy day!


Begin with 2 green peppers, cut in half and seeded...


..place into a pot of salted, boiling water for 3 minutes.  No need to wait for the water to return to boiling to start the timer.


After 3 minutes remove peppers from the water.  Place upside down on a paper towel to drain excess water.


Turn over and lightly salt the inside of the pepper.


Set aside in a baking dish while making the filling.


In a large pan, saute onion in olive oil and salt til onions are translucent.  Add in hamburger, salt & pepper and brown, then add tomatoes, rice, water, worcestershire sauce & seasonings.  Bring to a simmer, cover and cook on low for 15-20 minutes or til the liquid is absorbed and the rice is tender.


Spoon the filling into the pepper halves.  It's more than you need, but I just let it fill up the whole dish.  Bake uncovered for about 20 minutes, just til the top is brown and a bit crispy.  Enjoy!

Stuffed Bell Peppers

2 green bell peppers
1 small onion, chopped
3/4 lb hamburger
1 can diced tomatoes
1/2 c water
1/3 c rice
2 T worcestershire sauce
1/2 t italian seasoning
salt & pepper

Halve and seed green peppers.  Place them in boiling water for 3 minutes.  Remove upside down to a paper towel to drain.   Turn over and lightly salt inside.  Place in a casserole and set aside.

For filling, saute onion in a large saute pan in olive oil with a little salt to help them sweat.  Add in hamburger with salt and pepper, brown.  Add in remaining ingredients and bring to a simmer.  Cover and simmer on low for 15-20 minutes, or til liquid is absorbed and rice is tender.  Preheat oven to 375F.

Fill peppers and bake uncovered for about 20 minutes, or til top is browned and crispy.